September 18, 2024

Finding your optimum MTU

Finding your optimum MTU can help get the best Internet speed. MTU stands for Maximum Transmission Unit, which is basically the size of the packet sent from your PC to the Internet.

Default MTU size

Cable = 1500
PPOE = 1492 or lower
VPN = 1300

Most routers allow you change the MTU from their Web GUI. It is usually set to 1500 or you can have it set to Auto. To change it on the PC’s is a little harder.

On Windows 7, open a command prompt

To check what the MTU is on all subinterfaces type

netsh interface ipv4 show subinterfaces

To set it type

netsh interface ipv4 set subinterface "Local Area Connection" mtu=1500 store=persistent

To find out what MTU to set, open a command prompt and type

ping -f -l 1472 www.yahoo.com

Using a -f switch sets it not to fragment the packets.
The -l switch is used to set the packet size.

I used www.yahoo.com as the destination to ping. You can use whichever.

1472 = Ethernet Default MTU
28 = Packet Header

1472 + 28 = 1500

If the packet can’t be sent because it would need to be fragmented you will get something similar to this:

Packet needs to be fragmented but DF set.

So you will need to run the ping command with different packet sizes to determine the optimum packet size. Keep trying lower packet sizes by 10 (i.e. -l 1460, 1450, 1440, etc.) until you get a successful ping request. Raise your packet sizes by one until you get a “Packet needs to be fragmented but DF set.”. The last successful value plus 28 will be your MTU value.
For example a packet size of 1460 succeeds, but 1461 fails, so 1460 + 28 = 1488.

I had the Cisco VPN software installed which changed my MTU to 1300. I uninstalled the software and rebooted, but my MTU still was set to 1300. I ran the netsh command above and it changed it, but after a reboot it reverted back to 1300.

I found the location in the registry where the MTU setting is kept and changed it there.

HKEY_LOCAL_MACHINE\SYSTEM\CurrentControlSet\Services\Tcpip\Parameters\Interfaces

I then went through the different interfaces, until I found the one with my current IP for the Lan Interface. I edited the MTU and set the hexadecimal value of 5dc. Which sets the MTU to 1500. I closed the registry and rebooted. The MTU was now still set to 1500. Success.

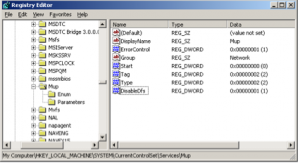
DFS disabled on Windows 7

DFS (Distributed File System) not working on Avid Windows 7 PC’s. I had gotten a call from one of our editorial support techs. They were deploying Windows 7 PC’s on the domain with the Avid editing software.  They were not able to connect to DFS shares on the domain. This is the error they would try and connect to a DFS, “An unexpected network error has occurred.”   DFS has been working fine on our PC’s which use the same hardware as they did.  HP Z800’s the only difference is they had a PCI-E Controller for the Avid hardware.

The PC had the Avid Unity MediaNetwork client software installed. After checking online, it turns out the Avid Unity software disables DFS on Windows 7 by default. Here’s the PDF were I found out about this on page 17.

I was able to fix this remotely. I ran computer management from the Administrative Tools in the control panel | services | turned on Remote Registry.

I then ran regedit from Start | Run | regedit | File |  Connect Network Registry

I then just browsed to

HKEY_LOCAL_MACHINE\SYSTEM\CurrentControlSet\Services\Mup

and right click on DisableDfs entry and select modify.

Type 0 in the Value data text box to enable DFS or Type 1 to disable it.

Configuration Error 213:5 on Photoshop CS5 MAC

I had this Configuration Error 213:5 come up recently for an artist I was helping. He was on a MAC running Photoshop CS5. This error came up when we launched Photoshop. It would lock up Photoshop and after clicking ok on the error, Photoshop would just close.

I tried resetting the Photoshop Prefs (Shift+Command+Option when starting Photoshop), but we could not get the reset prefs dialog to come up.  I then tried manually deleting the prefs folder located here

Mac OS X: Users [username]; Library; Preferences; Adobe Photoshop CS5 Settings

I then uninstalled Photoshop by using the uninstall shortcut. I then installed it again and got the
error. I looked online and found this web page from Adobe.

http://kb2.adobe.com/cps/827/cpsid_82744.html#main_SLStore

It mentions to make sure the permissions on this folder

/Library/Application Support/Adobe/SLStore

Match the permissions below.

drwxrwxrwx root admin

That folder already had the correct permissions.

After trying many things, I finally figured it out.
The permissions also had to be applied to the two files inside the
/Library/Application Support/Adobe/SLStore folder.

I couldn’t change the permissions from the shell.
I had to do it from the gui.

Mac OS X 10.5 and 10.6

Using Finder, navigate to the folder to be modified.
Adobe PCD folder locations
SLStore folder locations
Control+click the folder, and select Get Info.
Expand the Sharing & Permissions section.
Click Details to show the various owner and group options.
Click the lock icon in the lower-right corner.
Enter your administrator username and password when prompted, and click OK.
Set the permissions according to

Mac OS:

Owner = System = read/write
Group = Admin = read/write
Everyone = read/write
Or from the terminal, drwxrwxrwx root admin

Now Photoshop launches fine.

Fixing Profile Issues in Windows 7

A lot of Windows 7 issues can be resolved simply by creating a new Windows 7 profile.  Here’s a common error you get, “You have been logged in with a temporary profile.”  If your users log on to the domain and do not have local admin rights then any virus they get will get contained only to their profile.  So by moving the profile a side and creating them a new profile, this will completely remove the virus.

For example, companies that have domain users like in our company, have roaming profiles turned on. So if a user is having issues on multiple computers, but everyone else works fine on the same PC’s. Then the simplest solution is to log the user out and rename their local profile and their network profile to profilename_backup. Then just reboot the PC and have the user log back in, so a new profile gets created. Then you can copy all their files back from the local profile that was renamed. I would just copy over their Desktop files, favorites, and specific files.

In Windows XP, user profiles are located here

c:\Document and Settings

In Windows 7, user profiles are located here

c:\Users

The path to the network profile is set by your Domain Admin, look in Active Directory Users & Computers for the user account under the Profile tab.

This is all you had to do on Windows XP, but now in Windows 7 there is another extra step. You need to go into the registry and delete the reference to the old profile.

Go to Start | Run | regedit.exe

Then browse to

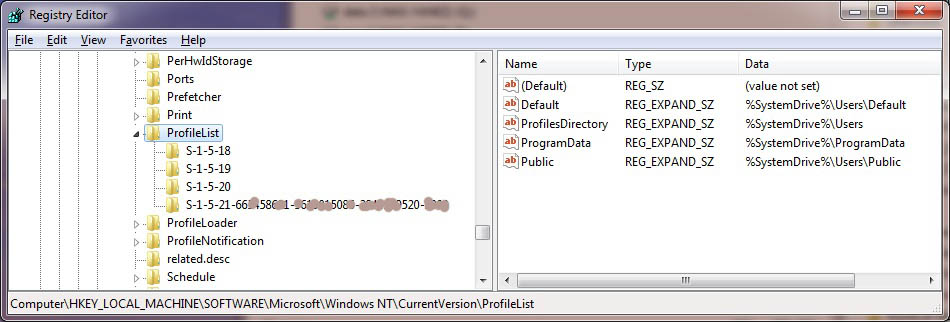
HKEY_LOCAL_MACHINE\SOFTWARE\Microsoft\Windows NT\CurrentVersion\ProfileList

Then browse through the sub folders until you locate the one for your user name.  Each sub folder will have a record called ProfileImagePath which has the path to your profile. Then just delete the whole sub folder in the registry which contains your user name.

Now reboot the PC and log back in and copy their files back from the local backed up profile and log out and back in, so the profile gets copied to the network.

Run Multiple Websites on your 1&1 Host Account

This blog is about how to run multiple web sites on one 1&1 Linux host account.  I wanted to run three of my web sites from my one 1&1 linux host account.

SSH over to your linux host account using an ssh client like putty. Then create folders for each of your domains.

ssh username@domain1.com
mkdir domain1
mkdir domain2
mkdir domain3

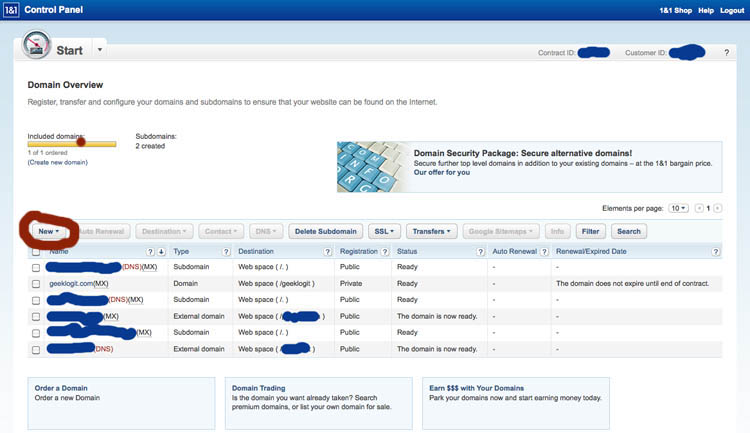
Go to your 1&1 Control Panel and click on Domains.  Click on New, then Add Domain.

After you created all your domains change the destinations in the Domains section of the 1&1 Control Panel to the folders you created earlier.  Now just put all of web site content for each of your web sites in the correct folders.

You should now be able to browse all your sites from your web browser.

WordPress Install with 1&1 Hosting

1&1 hosting offers WordPress as a Click & Build application. Which makes it an easy install, but they usually use an older version. I have the 1&1 Linux Hosting package which is required for WordPress on 1&1 to have access to MySQL.

I opted to install the latest version, so I had to manually install it.

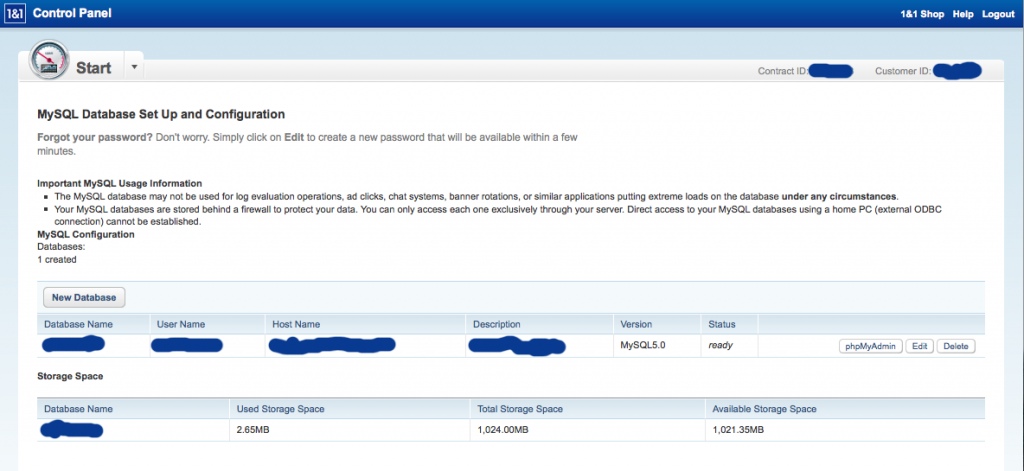
You need to setup the MySQL database from 1&1 Control Panel – MySQL Administration.

Click on “New Database”

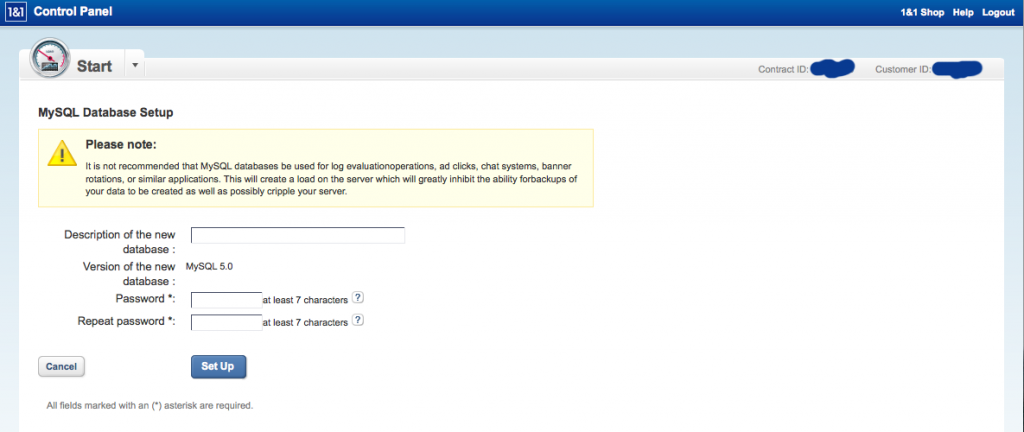
Enter a description, setup a password, and click on “Set Up”

Once the Database shows a status of “Ready” then go on to the next step.

Now ssh over to you 1&1 shell account using an a shell (Putty). From the 1&1 control panel click on Secure Shell (SSH) Access. This page will provide you with the hostname, username and you can set the password here for ssh.

Now download WordPress from wordpress.org

ssh username@geeklogit.com
wget http://wordpress.org/latest.tar.gz
tar -zxvf latest.tar.gz
mv wordpress geeklogit
cd geeklogit

Now we need to copy and rename the wp-config-sample.php file to wp-config.php.

cp wp-config-sample.php wp-config.php
vi wp-config.php

Change the fields below with your info.

define('DB_NAME', 'username');

/** MySQL database username */
define('DB_USER', 'databasename');

/** MySQL database password */
define('DB_PASSWORD', 'databasepassword');

/** MySQL hostname */
define('DB_HOST', 'databasename.db.1and1.com');

Then save the changes. (ESC then shift ZZ for VI)

Now open up your web browser to the URL of your WordPress blog. Then type in your site and add /wp-admin/install.php to the address (example: www.hostname.com/wp-admin/install.php or www.hostname.com/blog/wp-admin/install.php

For my site, I created a subfolder called geeklogit in the root of shell account. Then in the 1&1 Control Panel under Domains Destinations I put /geeklogit. So for my site it would be http://www.geeklogit.com/wp-admin/install.php.

From this page, WordPress will have you finish setting it up and give you an admin password. Please write this down. You will use this log on and make changes to your blog.

Anuko Time Tracker

My client also needed a free piece of software for time tracking. We found Anuko Time Tracker. I set this up on there CentOS 5.3 server. These instructions are pretty much the same as on Anuko’s website. I added a few things I figured out on my own.

Check Prerequisites, whether you have the following installed, configured, and working properly:

  1. Apache web server
  2. PHP4 or PHP5 (GD with Freetype fonts support included, mbstring included)
  3. MySQL server

Download Time Tracker Distribution

wget http://www.anuko.com/downloads/time_tracker/anuko_time_tracker.zip

Unpack distribution files into a selected directory for Apache web server. If you have a previous deployment of time tracker – backup it, remove it and then deploy the new code.

cd /path/to/DocumentRoot/
unzip anuko_time_tracker.zip
cd timetracker

Set world write file access permissions for directory WEB-INF/templates_c/

chmod 777 WEB-INF/templates_c</pre>
Create MySQL database and MySQL user. Grant SQL permissions.
mysql -h localhost -u root -p
mysql< CREATE DATABASE timetracker;
mysql< GRANT ALL PRIVILEGES ON timetracker.* TO 'ttuser'@'localhost' IDENTIFIED BY 'yourpassword';</pre>

Copy and modify config file

$ cd WEB-INF
$ cp config.php.dist config.php

Change $dsn value to reflect your database connection parameters (user name and password):

define("DSN",'mysql://ttuser:yourpassword@localhost/timetracker');

If you install the time tracker into a sub-directory of your site, make sure this is reflected in the APP_NAME parameter in WEB-INF/config.php. For example, for http://localhost/timetracker/ set
define(“APP_NAME”,’timetracker’);

Install or update MySQL schema and initial data:
http://localhost/timetracker/dbinstall.php

Remove or disable install script:

cd ../..
chmod 000 dbinstall.php

Login to your time tracker site as admin with the password “secret” (without quotes) and change admin password.

http://localhost/timetracker

Click Options menu item.

login: admin
pass: secret

Also make sure the line below is in the mysql.ini file.

/etc/php.d/mysql.ini
extension=mysql.so

You will need to install these as well to the the pie graphs working.

yum install php-mysql
yum install php-mbstring
yum install php-pear-DB
yum install php-gd

Request Tracker Install

Hi all, this is my first post.  I wanted to share my previous and new installs I have done.

I had a client who was starting up a small company abroad in Mexico.  They wanted a free ticketing system.  They purchased a couple of Dell Powerage R710 servers.

Here is what we decided to load on them.

CentOS 5.3. 64bit.

RT 3.8.7 (Request Tracker)

Installed CentOS 5.3 64bit with these options

Installation Type

  • Server

Disk Partitioning Setup

  • Automatically partition
  • Remove all partitions on this system

Network Configuration

  • Use Static IP Address
  • Hostname – enter manually “rt.example.com”
  • Gateway
  • DNS

Firewall Configuration

  • Enable Firewall
  • Enable SSH, HTTP, HTTPS, FTP, SMTP

Language

  • English

Timezone

  • US/Los Angeles

Set Root Password

  • Password

Package Group Selection

  • Web Server
  • Mail Server
  • DNS Name Server
  • FTP Server
  • MYSQL Database

Disable SELINUX

Install
Reboot

yum install mysql-server
yum install php-mysql

Start mysql server service

service mysqld start

Start the mysql service every time the server starts

chkconfig mysqld on

Install Priorities

yum install yum-priorities

Make sure that yum-priorities is enabled by editing the /etc/yum/pluginconf.d/priorities.conf file, and ensuring that it contains the following lines:

[main]
enabled=1

Edit the .repo files in /etc/yum.repos.d/ and set up priorities by adding the line:

priority=N

to a repository entry, where N is an integer number from 1 to 99.

The recommended settings are:

[base], [addons], [updates], [extras] ... priority=1
[centosplus],[contrib] ... priority=2
Third Party Repos such as rpmforge ... priority=N  (where N is > 10 and based on your preference)

Download the rpmforge-release package. Choose one of the two links below, depending on your architecture. If you are unsure of which one to use you can check your architecture with the command uname -i

x86_32 http://apt.sw.be/redhat/el5/en/i386/RPMS.dag/rpmforge-release-0.3.6-1.el5.rf.i386.rpm

x86_64 http://apt.sw.be/redhat/el5/en/x86_64/RPMS.dag/rpmforge-release-0.3.6-1.el5.rf.x86_64.rpm

Type

wget http://apt.sw.be/redhat/el5/en/x86_64/RPMS.dag/rpmforge-release-0.3.6-1.el5.rf.x86_64.rpm

Install DAG’s GPG key

rpm --import http://dag.wieers.com/rpm/packages/RPM-GPG-KEY.dag.txt

Verify the package you have downloaded

rpm -K rpmforge-release-0.3.6-1.el5.rf.x86_64.rpm

Security warning: The rpmforge-release package imports GPG keys into your RPM database. As long as you have verified the package and trust Dag then it should be safe.

Install the package

rpm -i rpmforge-release-0.3.6-1.el5.rf.x86_64.rpm

This will add a yum repository config file and import the appropriate GPG keys. At this point, you can set the priority of the RPMForge repository, and also of the CentOS repositories if you have not done so yet.

Test with this command:

yum check-update

It should output these two lines:

Loading "priorities" plugin
...
76 packages excluded due to repository priority protections

The number above may differ, but there should be several packages shown as being excluded.

If so then it looks like things are working so try installing something like this

yum install mplayer

Install Apache and mod_perl:

yum install httpd httpd-devel apr-devel mysql-client mysql-devel mod_perl

…and also some CPAN module dependencies…

yum install freetype-devel gd-devel libjpeg-devel libpng-devel xorg-x11-devel

Install ncftpget, it’s required by some CPAN modules.

http://rpmfind.net/linux/rpm2html/search.php?query=ncftp

rpm –i ftp://rpmfind.net/linux/epel/5/x86_64/ncftp-3.2.2-1.el5.x86_64.rpm

RT Pre-Install: Security

groupadd rt

Change rt:x:500 line in /etc/group to the rt:x:500:apache

Confirm SELinux is disabled. 

/etc/selinux/config to SELINUX=disable

Change permssions on log files.

chmod -Rf 755 /etc/httpd/logs
reboot

RT Pre-Install: Perl Modules

yum install perl-Apache-Session perl-Class-Container perl-Class-Data-Inheritable perl-Crypt-DES perl-Devel-StackTrace perl-Exception-Class perl-GD perl-GD-Graph perl-GD-Text-Util perl-Hook-LexWrap perl-HTML-Mason perl-HTTP-Server-Simple perl-HTTP-Server-Simple-Mason perl-IO-Socket perl-Net-SNMP perl-Params-Validate perl-Socket6 perl-XML-RSS perl-DBD-mysql
perl -MCPAN -e shell
cpan> install Bundle::CPAN
cpan> exit

RT Install

wget http://download.bestpractical.com/pub/rt/release/rt.tar.gz
tar xzf rt.tar.gz
cd rt-*/
./configure --with-web-user=apache --with-web-group=apache --with-web-handler=modperl2 --with-db-type=mysql
perl sbin/rt-test-dependencies --with-mysql --with-modperl2 --install

Check, whether some required modules still missing and install them if needed.

perl sbin/rt-test-dependencies --with-mysql --with-modperl2 --verbose|grep MISSING

If dependencies are missing, install them

perl –MCPAN –e ‘install Calendar::Simple’

Install RT.

As root and from within the rt build directory, type:

make install

Init DB

Now you need to modify the installed [=etc/RT_SiteConfig.pm] to specify the connections to your DBMS engine and then type:

Location /opt/rt3/etc/RT_SiteConfig.pm

RT_SiteConfig.pm  “Start”

Set($rtname, 'www.example.com');
Set($Organization , "example.com");

Set($DatabaseUser , 'rt_user');
Set($DatabasePassword , 'password');
Set($MinimumPasswordLength , "8");

Set($Timezone , 'US/Pacific');

Set($DatabaseType , 'mysql');
Set($DatabaseName , 'rtdb');

Set($OwnerEmail , 'root');
Set($CorrespondAddress , 'support@example.com');
Set($CommentAddress , 'support-comment@example.com');
Set($MaxAttachmentSize , 10000000);
Set($TruncateLongAttachments , undef);

Set($SendmailPath , '/usr/sbin/sendmail');

Set($WebBaseURL, 'http://www.example.com:80');

Set($WebPath, '/rt');

Set(@Plugins,qw(RT::FM));

#Set(@Plugins,(qw(Extension::QuickDelete RT::FM)));

1;

RT_SiteConfig.pm  “END”

make initialize-database
mysql
mysql> USE mysql;
mysql> UPDATE user SET Password=PASSWORD(‘new-password’) Where user=’root’;
mysql> FLUSH PRIVILEGES;

For some database backends (MySQL at least) it is not able to create the database user. So you have to create that user beforehand and you have to give it rights for the database.

For MySQL with the default [=$DatabaseUser], [=$DatabaseName] and [=$DatabasePassword], do this SQL command (as root database user):

mysql> GRANT ALL PRIVILEGES ON rtdb.* TO 'rt_user'@'localhost' IDENTIFIED BY 'rt_pass';

Replace the values ‘rtdb’, ‘rt_user’, ‘localhost’ and ‘rt_pass’ by whatever is appropriate for you.

Drop DB if something goes wrong

If the make fails, type:

make dropdb

fix whatever’s broken, and start over from step “init DB” step

If still failing…

If make install still fails, look in /etc/httpd/httpd.conf, /etc/httpd/conf/httpd.conf or /etc/httpd/conf/commonhttpd.conf (or wherever your httpd.conf is; this may vary by Unix distribution; locate httpd.conf may help)

locate httpd.conf

for a line that reads “Group <something>” and another that reads “User <somebody>”  You can use grep to find words in a file.

grep User httpd.conf

Go to your RT source directory and type (without the brackets, substituting the right Group and User from the file you just looked at):

./configure --with-web-group= --with-web-user=

Apache configuration

Append following lines to the /etc/httpd/conf.d/perl.conf

This setup is for having RT as your main and only site

Listen ip_of_the_rt.example.com:80

 ServerName rt.example.com
 ServerAdmin Email.Address@example.com

 DocumentRoot /opt/rt3/share/html

 AddDefaultCharset UTF-8
 PerlRequire /opt/rt3/bin/webmux.pl

   Order allow,deny
   Allow from all

   SetHandler perl-script
   PerlResponseHandler RT::Mason

To have  RT as a subfolder use this setup

Listen www.example.com:80

 ServerName www.example.com
 ServerAdmin admin@example.com

 # config for your main content
 DocumentRoot /var/www/

  # here and in other places goes config
  # of your main host

 # as RT is out of document root then we want alias
 # and should define directory access

 Alias /rt /opt/rt3/share/html

  Order allow,deny
  Allow from all

 PerlRequire /opt/rt3/bin/webmux.pl

  AddDefaultCharset UTF-8
  SetHandler perl-script
  PerlHandler RT::Mason

 Alias /timetracker /opt/timetracker

  Order allow,deny
  Allow from all

Restart Apache

/sbin/service httpd stop
/sbin/service httpd start

If httpd does not start

Check /etc/httpd/conf/httpd.conf for any Listen commands and disable them

By putting a comment in front of it.

#Listen 80

Now open web browser and go to.

http://rt.example.com

Default username= root

Default password= password

Then Change Password

RTFM

Installation is a fairly straightforward process (this process assumes that you already have a fully functional instance of RT3 installed and that you are not upgrading a previous installation of RTFM) :

cd /usr/local/src
wget http://download.bestpractical.com/pub/rt/release/RTFM-2.4.1.tar.gz
tar zxf RTFM-2.4.1.tar.gz
cd RTFM-2.4.1
perl Makefile.PL
make install
make initdb

Then edit your RT_SiteConfig (or RT_Config) to include this line:

Set(@Plugins,qw(RT::FM));

Finally, restart your web server:

/etc/init.d/httpd stop
/etc/init.d/httpd start

In the web interface, I went to RTFM / Configuration /Create  Custom

Fields for RTFM Articles.

Name: Body

Description: Body of FAQ

Type: Fill in One Wikitext area

Applies to: RTFM Articles

Create New Class

Name: Body

check enabled

, then selected the body CF.  At this point I was at

the “Editing CustomField Body” page.  I clicked on the

“Applies To” link, selected objects, check Body.

Create folder: /opt/rt3/local/plugins/RT-FM/html/Elements/

cp /opt/rt3/share/html/Elements/EditCustomFieldWikitext /opt/rt3/local/plugins/RT-FM/html/Elements/EditCustomFieldWikitext
chmod u+w EditCustomFieldWikitext

Edit: /opt/rt3/local/plugins/RT-FM/html/Elements/EditCustomFieldWikitext

Add before “% while”:

% my $wiki_textarea_value = $NamePrefix .$CustomField->id .'-Values';
% my $wiki_format_toolbar = qq(
%</pre>
<div>% <input style="font-weight: bold;" onclick="javascript:lbc(event,'$wiki_textarea_value','bold');" type="button" value="B" />
% <input style="font-style: italic;" onclick="javascript:lbc(event,'$wiki_textarea_value','italic');" type="button" value="I" />
% <input style="font-weight: bold; font-style: italic;" onclick="javascript:lbc(event,'$wiki_textarea_value','bold_italic');" type="button" value="BI" />
% <input onclick="javascript:lbc(event,'$wiki_textarea_value','heading');" type="button" value="H1" />
% <input onclick="javascript:lbc(event,'$wiki_textarea_value','subheading');" type="button" value="H2" />
% <input onclick="javascript:lbc(event,'$wiki_textarea_value','subsubheading');" type="button" value="H3" />
% <input onclick="javascript:lbc(event,'$wiki_textarea_value','list');" type="button" value="List" />
% <input onclick="javascript:lbc(event,'$wiki_textarea_value','link');" type="button" value="Link" />
% <input style="font-weight: bold; color: red;" onclick="javascript:lbc(event,'$wiki_textarea_value','highlight');" type="button" value="!" />
% <input onclick="javascript:lbc(event,'$wiki_textarea_value','code');" type="button" value="Code" />
% <input onclick="javascript:lbc(event,'$wiki_textarea_value','image');" type="button" value="Image" />
%</div>
<pre>% );
% print $wiki_format_toolbar;

Add in both “textarea” tags: <textarea … id=”<%$NamePrefix%><%$CustomField->Id%>-Values”…</textarea> Regarding the textarea tags, the section id=”…-Values” needs to be added to the 2 existing textarea tags. For me they were on lines 66 and 69 of the EditCustomFieldWikitext file. I inserted the id section after Rows and before Name.

chmod u+w /opt/rt3/local/plugins/RT-FM/html/RTFM/Article/Edit.html

Edit: /opt/rt3/local/plugins/RT-FM/html/RTFM/Article/Edit.html Add before “form”:

<script type="text/javascript">// <![CDATA[
    function lbc(e, objname, theTag) { var el = document.getElementById(objname); var enclosingTag; var spaceTag = '\ '; if(theTag == 'bold'){         startTag = '\'\'\'';         endTag = '\'\'\'';         spaceTag = ''; } if(theTag == 'italic'){         startTag = '\'\'';         endTag = '\'\'';         spaceTag = ''; } if(theTag == 'bold_italic'){         startTag = '\'\'\'\'\'';         endTag = '\'\'\'\'\'';         spaceTag = ''; } if(theTag == 'heading'){         startTag = '=';         endTag = '='; } if(theTag == 'subheading'){         startTag = '==';         endTag = '=='; } if(theTag == 'subsubheading'){         startTag = '=====';         endTag = '====='; } if(theTag == 'link'){         startTag = '[';         endTag = ']'; } if(theTag == 'list'){         startTag = '\ \ \ \ *\ ';         endTag = ''; } if(theTag == 'highlight'){         startTag = '!';         endTag = '!';         spaceTag = ''; } if(theTag == 'code'){         startTag = '%code%';         endTag = '%/code%'; } if(theTag == 'image'){         startTag = '%image%';         endTag = '%/image%'; } if (el.setSelectionRange) { //Mozilla or FireFox Code         var st = el.scrollTop;         var ss = el.selectionStart;         var se = e.selectionEnd;         el.value = el.value.substring(0,el.selectionStart) + startTag + spaceTag + el.value.substring(el.selectionStart,el.selectionEnd) + spaceTag + endTag + el.value.substring(el.selectionEnd,el.value.length);         el.selectionStart = ss;         el.selectionEnd = ss;         el.scrollTop = st; } else if (document.selection && document.selection.createRange) {         //Internet Explorer Code         el.focus(); //Makes sure tags are being added to the textarea         var range = document.selection.createRange();         range.text = startTag + spaceTag + range.text + spaceTag + endTag; //Adds beginning and end tags. } el.focus(); }
// ]]></script>

chmod u-w /opt/rt3/local/plugins/RT-FM/html/RTFM/Article/Edit.html
chmod u+w /usr/lib/perl5/site_perl/5.8.8/Text/WikiFormat.pm

Edit : /usr/lib/perl5/site_perl/5.8.8/Text/WikiFormat.pm Add the following to the %tags declaration:

code_html_start	=> sub { "</pre>
<table width="\&quot;90%\&quot;" border="\&quot;0\&quot;" cellspacing="\&quot;1\&quot;" cellpadding="\&quot;3\&quot;" align="\&quot;center\&quot;">
<tbody>
<tr>
<td><span><strong>Code:</strong></span></td>
</tr>
<tr>
<td><code>$_[0]" }, code_html_end => sub { "$_[0]</code></td>
</tr>
</tbody>
</table>
<pre>" },
code_tag_start        => qr/\%code\%(.*?)/,
code_tag_end        => qr/(.*?)\%\/code\%/,

image_html_start	=> sub { "</pre>
<img src="\&quot;$_[0]&quot;" alt="" />
<pre> sub { "$_[0]\" alt=\"Uploaded Image\" border=\"0\" />" },
image_tag_start        => qr/\%image\%(.*?)/,
image_tag_end        => qr/(.*?)\%\/image\%/,

Add the following to the format_line definition:

$text =~ s!$tags->{code_tag_start}!$tags->{code_html_start}->($1, $opts)!eg;
$text =~ s!$tags->{code_tag_end}!$tags->{code_html_end}->($1, $opts)!eg;

$text =~ s!$tags->{image_tag_start}!$tags->{image_html_start}->($1, $opts)!eg;
$text =~ s!$tags->{image_tag_end}!$tags->{image_html_end}->($1, $opts)!eg;
chmod u-w /usr/lib/perl5/site_perl/5.8.8/Text/WikiFormat.pm

Modification to sendmail’s mc file (/etc/mail/sendmail.mc):

define(`SMART_HOST',`smtp.gmail.com')dnl
define(`RELAY_MAILER_ARGS', `TCP $h 587')dnl
define(`ESMTP_MAILER_ARGS', `TCP $h 587')dnl
define(`confAUTH_MECHANISMS', `EXTERNAL GSSAPI DIGEST-MD5 CRAM-MD5 LOGIN PLAIN')dnl
FEATURE(`authinfo',`hash /etc/mail/auth/client-info')dnl

If you don’t have an /etc/mail/auth directory, as root, create one like this:

mkdir -p /etc/mail/auth
chmod 700 /etc/mail/auth

You won’t have the next client-info files so you’ll have to create it (with you favorite Unix editor). Change the permissions on the client-info file like this:

chmod 600 client-info

So using my user_id@gmail.com email ID and password I made the following entry in /etc/mail/auth/client-info:

cat /etc/mail/auth/client-info


AuthInfo:smtp.gmail.com "U:smmsp" "I:user_id" "P:password" "M:PLAIN"
AuthInfo:smtp.gmail.com:587 "U:smmsp" "I:user_id" "P:password" "M:PLAIN"

Yes, the password is plain text. Remember to replace user_id with your Gmail email ID (your email addresse without the @gmail.com) and password with your email password. Also make sure that the client-info file has right permissions so nobody can read your password. How to compile it into a db file:

cd /etc/mail/auth
makemap -r hash client-info.db client-info
m4 sendmail.mc > sendmail.cf

Then restart sendmail service

service sendmail restart

First You need to uncomment the local loopback line to look as follows:

vi /etc/mail/sendmail.mc
dnl DAEMON_OPTIONS(`Port=smtp,Addr=127.0.0.1, Name=MTA')

To finalize your changes run:

m4 /etc/mail/sendmail.mc /etc/mail/sendmail.cf

You also need to add your mail server to the access list to be able to relay mail to your rt server:

vi /etc/mail/access
smtp.gmail.com       RELAY

You then need to rewrite the access DB:

makemap hash /etc/mail/access.db < /etc/mail/access

Now add an entry for the rt server alias:

vi /etc/mail/local-host-names
rt.example.com

If smrsh is used (it is by default usually)

ln -s /opt/rt3/bin/rt-mailgate /etc/smrsh/rt-mailgate

Finally restart Sendmail

service sendmail restart

Setting up mail retrieval via shell command

yum install openssl-perl

Gmail configured to allow pop3 mail downloading for your account: Settings => Forwarding and POP in your Gmail web account. Turn on POP

mkdir ~/.certs

Now we retrieve the Gmail certificate provided by the Gmail pop server:

openssl s_client -connect pop.gmail.com:995 -showcerts

Copy everything from (and including) the —–BEGIN CERTIFICATE—– to the —–END CERTIFICATE—–, and save it in your new .certs directory as ‘gmail.pem’. Now we also need a copy of the certificate of the issuer, in google’s case Equifax Secure Certificate Authority.

wget -O Equifax_Secure_Certificate_Authority.pem \ https://www.geotrust.com/resources/root_certificates/certificates/Equifax_Secure_Certificate_Authority.cer
chmod 644 Equifax_Secure_Certificate_Authority.pem
chmod 644 gmail.pem

Now that we have both certificates stored in ~/.certs we just need to rehash them so SSL (and fetchmail) can read and use them:

c_rehash ~/.certs/
Doing /home/user5/.certs/
gmail.pem => 7f549ca4.0

Testing certificates To confirm we have the correct and working certificates, let us make an SSL connection to the Gmail server testing our 2 new certificates:

$ openssl s_client -connect pop.gmail.com:995 -CApath ~/.certs/
... ...
---
+OK Gpop ready for requests from ....

There should be much more data in between, however the important thing to note is the final (or similar) +OK Gpop ready for requests from …. If not, please retrace the above steps to confirm you have it correct. Create .fetchmailrc in home folder of user Enter this in file

set syslog
set daemon 300
poll pop.gmail.com with proto POP3 and options no dns
user 'support@example.com'    pass "password"   mda "/opt/rt3/bin/rt-mailgate --url http://www.example.com/rt --queue General --action correspond"
ssl sslcertck sslcertpath /home/jsmith/.certs/
user ‘support-comment@example.com’   pass “password”   mda "/opt/rt3/bin/rt-mailgate --url http://www.example.com/rt --queue General --action comment"
ssl sslcertck sslcertpath /home/jsmith/.certs/

At the prompt type

fetchmail

Setting up mail retrieval via fetchmail daemon

yum install openssl-perl

Gmail configured to allow pop3 mail downloading for your account: Settings => Forwarding and POP in your Gmail web account. Turn on POP

adduser –r –m fetchmail
cd /etc/init.d
touch fetchmail
vi fetchmail

Enter text below in vi

*** FILE : /etc/init.d/fetchmail ***

#!/bin/sh
#
# chkconfig: - 91 35
# description: Starts and stops fetchmail in daemon mode
#
# Source function library.
if [ -f /etc/init.d/functions ] ; then
  . /etc/init.d/functions
elif [ -f /etc/rc.d/init.d/functions ] ; then
  . /etc/rc.d/init.d/functions
else
  exit 1
fi

# Avoid using root's TMPDIR
unset TMPDIR

# Check that fetchmailrc exists.

[ -f /etc/fetchmailrc ] || exit 6

RETVAL=0

start() {
        KIND="fetchmail"
        echo -n $"Starting $KIND services: "
        daemon --user fetchmail fetchmail -f /etc/fetchmailrc --syslog
        RETVAL=$?
        echo
        return $RETVAL
}

stop() {
        KIND="fetchmail"
       echo -n $"Shutting down $KIND services: "
       runuser fetchmail -c 'fetchmail --syslog --quit >dev/null 2>&1'
     RETVAL=$?
[ "$RETVAL" -eq 0 ] && success $"$base startup" || failure $"$base startup"
echo
return $RETVAL
}

restart() {
       stop
       start

}

reload() {
          echo -n $"Reloading fetchmailrc file: "
          RETVAL=$?
          echo
          return $RETVAL
}

rhstatus() {
        status fetchmail
        RETVAL=$?
}

# Allow status as non-root.
if [ "$1" = status ]; then
       rhstatus
       exit $?
fi

# Check that we can write to it... so non-root users stop here
[ -w /etc/fetchmailrc ] || exit 4

case "$1" in
  start)
       start
       ;;
  stop)
       stop
       ;;
  restart)
       restart
       ;;
  reload)
       reload
       ;;
  status)
       rhstatus
       ;;
*)
       echo $"Usage: $0 {start|stop|restart|reload|status}"
       exit 2
esac
exit $?

*** EOF : /etc/init.d/fetchmail ***

Then press ESC to switch into vi command mode. Then press Shift  ZZ to save and close the file.

chmod 755 fetchmail
su root
cd /home/fetchmail
mkdir .certs

Now we retrieve the Gmail certificate provided by the Gmail pop server:

openssl s_client -connect pop.gmail.com:995 -showcerts
[code lang="plain"]

Copy everything from (and including) the -----BEGIN CERTIFICATE----- to the -----END CERTIFICATE-----, and save it in your new .certs directory as 'gmail.pem'. Now we also need a copy of the certificate of the issuer, in google's case Equifax Secure Certificate Authority.

[code lang="plain"]
wget -O Equifax_Secure_Certificate_Authority.pem \ https://www.geotrust.com/resources/root_certificates/certificates/Equifax_Secure_Certificate_Authority.cer
chmod 644 Equifax_Secure_Certificate_Authority.pem
chmod 644 gmail.pem

Now that we have both certificates stored in /.certs we just need to rehash them so SSL (and fetchmail) can read and use them:

c_rehash .certs/
Doing /home/user5/.certs/
gmail.pem => 7f549ca4.0

Testing certificates

To confirm we have the correct and working certificates, let us make an SSL connection to the Gmail server testing our 2 new certificates:

openssl s_client -connect pop.gmail.com:995 -CApath ~/.certs/
... ...
---
+OK Gpop ready for requests from ....

There should be much more data in between, however the important thing to note is the final (or similar) +OK Gpop ready for requests from …. If not, please retrace the above steps to confirm you have it correct.

Create Fetchmail config

cd /etc
touch fetchmailrc
vi fetchmailrc

Enter this into the file fetchmailrc

*** FILE : /etc/fetchmailrc ***

set syslog
set daemon 300
poll pop.gmail.com with proto POP3 and options no dns
user 'support@example.com'    pass "password"   mda "/opt/rt3/bin/rt-mailgate --url http://www.example/rt --queue General --action correspond"

ssl sslcertck sslcertpath /home/fetchmail/.certs/

user ‘support-comment@example.com’   pass “password”   mda "/opt/rt3/bin/rt-mailgate --url http://www.example.com/rt --queue General --action comment"

ssl sslcertck sslcertpath /home/fetchmail/.certs/

*** EOF : /etc/fetchmailrc ***

Press ESC to switch into vi command mode.
Press Shift ZZ to save and close the file.

chown fetchmail /etc/fetchmailrc
chmod 710 fetchmailrc
service fetchmail start
service fetchmail stop

Add the fetchmail service to the server

chkconfig -add fetchmail

Set the service to start automatically

chkconfig fetchmail on

How to upgrade RT

Download latest version from

wget http://download.bestpractical.com/pub/rt/release/rt.tar.gz
tar xzf rt.tar.gz
cd rt-*/
./configure --with-web-user=apache --with-web-group=apache --with-web-handler=modperl2 --with-db-type=mysql
make upgrade
/opt/rt3/sbin/rt-setup-database --dba root --prompt-for-dba-password --action upgrade

Enter myql root password: password

Enter current RT version

Restart Apache

/sbin/service httpd stop
/sbin/service httpd start

How to backup the Databases

To backup MYSQL we can use mysqldump, ssh in as root and run these commands. When it asks for a password use password

This is to backup the RT mysql database

mysqldump -u root -p password > rtdbback.sql

This is to backup the Time Tracker mysql database

mysqldump -u root -p password > ttback.sql

These commands will create these two files rtdbback.sql & ttback.sql

Then just ftp those files to some other location for safe keeping or setup RSYNC to copy them to your desired location.

How to setup RSYNCD

Setup /etc/rsyncd.conf

touch /etc/rsyncd.conf
chmod 644 /etc/rsyncd.conf
vi /etc/rsyncd.conf

*** FILE : /etc/rsyncd.conf ***

motd file = /etc/rsyncd.motd
log file = /var/log/rsyncd.log
pid file = /var/run/rsyncd.pid
lock file = /var/run/rsync.lock

[an_identifier]
  path = /home/a_username/public_html
  use chroot = no
  max connections = 10
  auth users = a_username
  hosts allow = www1.producttoweb.com www2.yoursite.com www3.yoursite.com
  secrets file = /etc/rsyncd.secrets
  uid = a_username
  gid = a_groupname
  list = yes
  read only = no

*** EOF : /etc/rsyncd.conf ***

Setup your secrets file
– Passwords are in plain-text so make sure you change the permissions on the
file /etc/rsyncd.secrets to disallow all but the root user to view the file.
– This file can be named anything and located pretty much anywhere, but I
suggest /etc/rsyncd.secrets so that I can find it easily when I obtain root
access to your system.
– On some systems your username and password may need to be 8 characters or less.

touch /etc/rsyncd.secrets
chmod 600 /etc/rsyncd.secrets
vi /etc/rsyncd.secrets

*** FILE : /etc/rsyncd.secrets ***

a_username:a_password

*** EOF : /etc/rsyncd.secrets ***

Setup your iptables firewall to allow traffic on port 873
– You’ll need to add the following line into your iptables firewall setup.
Note that the location of this entry can be important.

— Example of restrictive (by ip address) iptables setup —
-A INPUT -j ACCEPT -p tcp -s [allowed host’s ip address 1] –dport 873
-A INPUT -j ACCEPT -p tcp -s [allowed host’s ip address 2] –dport 873
-A INPUT -j ACCEPT -p tcp -s [allowed host’s ip address 3] –dport 873
-A INPUT -j DROP -p tcp –dport 873

— Example of wide open iptables setup —
# Notice : I’m opening my port 873 to all traffic, but just during the testing process
-A RH-Firewall-1-INPUT -p tcp -m tcp –dport 873 -j ACCEPT

Linux commands

cp /etc/sysconfig/iptables /etc/sysconfig/iptables_backup
vi /etc/sysconfig/iptables # see contents file below
service iptables restart # restart your filewall

*** FILE : /etc/sysconfig/iptables ***

# Firewall configuration written by system-config-securitylevel
# Manual customization of this file is not recommended.
*filter
:INPUT ACCEPT [0:0]
:FORWARD ACCEPT [0:0]
:OUTPUT ACCEPT [0:0]
:RH-Firewall-1-INPUT - [0:0]
-A INPUT -j RH-Firewall-1-INPUT
-A FORWARD -j RH-Firewall-1-INPUT
-A RH-Firewall-1-INPUT -i lo -j ACCEPT
-A RH-Firewall-1-INPUT -p icmp --icmp-type any -j ACCEPT
-A RH-Firewall-1-INPUT -p 50 -j ACCEPT
-A RH-Firewall-1-INPUT -p 51 -j ACCEPT
-A RH-Firewall-1-INPUT -p udp --dport 5353 -d 224.0.0.251 -j ACCEPT
-A RH-Firewall-1-INPUT -p udp -m udp --dport 631 -j ACCEPT
-A RH-Firewall-1-INPUT -p tcp -m tcp --dport 631 -j ACCEPT

# HTTP(S) -  2011.8.1
-A RH-Firewall-1-INPUT -p tcp -m tcp --dport 80 -j ACCEPT
-A RH-Firewall-1-INPUT -p tcp -m tcp --dport 443 -j ACCEPT

# RSYNCD -  2011.8.1
-A RH-Firewall-1-INPUT -p tcp -m tcp --dport 873 -j ACCEPT

-A RH-Firewall-1-INPUT -m state --state ESTABLISHED,RELATED -j ACCEPT
-A RH-Firewall-1-INPUT -m state --state NEW -m tcp -p tcp --dport 22 -j ACCEPT
-A RH-Firewall-1-INPUT -j REJECT --reject-with icmp-host-prohibited
COMMIT

*** EOF : /etc/sysconfig/iptables ***

Setup rsyncd to run as a stand-alone daemon

touch /etc/rc.d/init.d/rsyncd
chmod 755 /etc/rc.d/init.d/rsyncd
vi /etc/rc.d/init.d/rsyncd
ln -s /etc/rc.d/init.d/rsyncd /etc/rc.d/rc2.d/S85rsyncd
ln -s /etc/rc.d/init.d/rsyncd /etc/rc.d/rc3.d/S85rsyncd
ln -s /etc/rc.d/init.d/rsyncd /etc/rc.d/rc5.d/S85rsyncd
ln -s /etc/rc.d/init.d/rsyncd /etc/rc.d/rc0.d/K15rsyncd
ln -s /etc/rc.d/init.d/rsyncd /etc/rc.d/rc1.d/K15rsyncd
ln -s /etc/rc.d/init.d/rsyncd /etc/rc.d/rc6.d/K15rsyncd
service rsyncd start

*** FILE : /etc/rc.d/init.d/rsyncd ***

#!/bin/sh
# Thanks To : http://www.fredshack.com/docs/rsync.html
# Rsyncd This shell script takes care of starting and stopping the rsync daemon
# description: Rsync is an awesome replication tool.
# Source function library.
. /etc/rc.d/init.d/functions

[ -f /usr/bin/rsync ] || exit 0

case "$1" in
start)
action "Starting rsyncd: " /usr/bin/rsync --daemon
;;
stop)
action "Stopping rsyncd: " killall rsync
;;
*)
echo "Usage: rsyncd {start|stop}"
exit 1
esac
exit 0

*** EOF : /etc/rc.d/init.d/rsyncd ***

Setup crons for backup

crontab –e


5 0 * * *  /usr/bin/mysqldump -u root --password=password rtdb  > /backup/rtdbback_`date +%F`.sql
10 0 * * * /usr/bin/mysqldump -u root --password=password timetracker  > /backup/ttback_`date +%F`.sql
15 0 * * * /bin/tar -pczf /backup/cyberwebsite_`date +%F`.tar.gz /var/www
25 0 * * * /bin/tar -pczf /backup/rt3_`date +%F`.tar.gz /opt/rt3
30 0 * * * /bin/tar -pczf /backup/timetracker_`date +%F`.tar.gz /opt/timetracker
35 0 * * * /bin/tar -pczf /backup/etc_`date +%F`.tar.gz /etc
40 0 * * * /bin/tar -pczf /backup/root_`date +%F`.tar.gz /root