March 19, 2024

Altiris Job for Acrobat 9 Standard

Here is the second software job I will post about.

This week, it will be Acrobat 9 Standard. We still use this older version. I was tasked to install this for a few users and it was a total pain to get it to updated to the latest patches. I believe Acrobat is up to 9.5.2. I tried their auto updater and it didn’t work for me. I had to manually download all the patches and patch it one by one. It took forever.
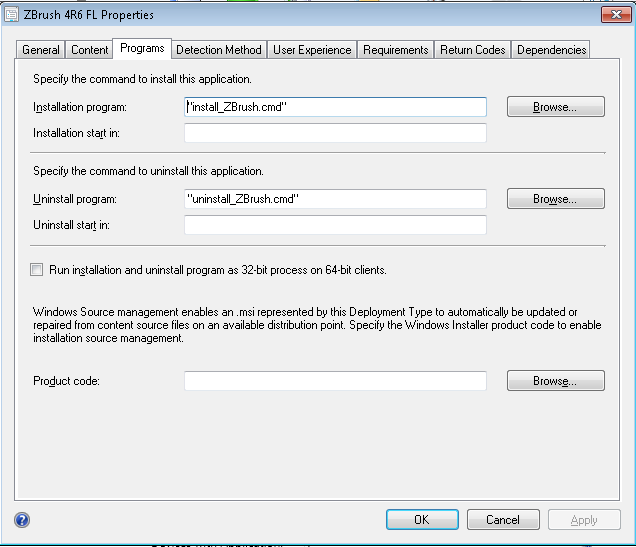
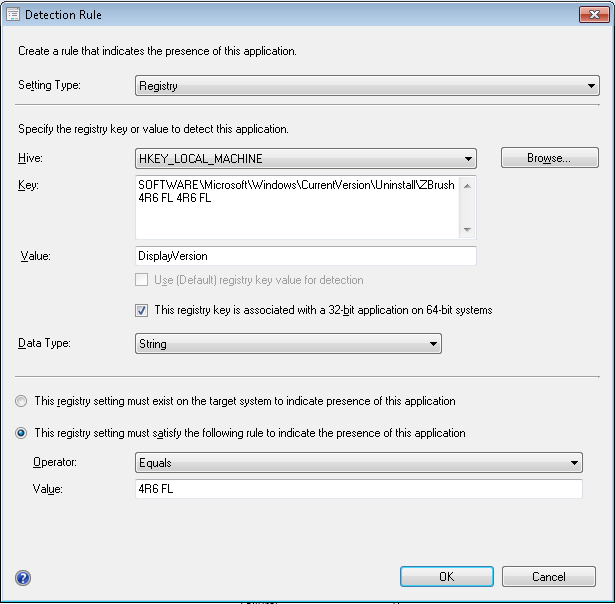
So since we had Altiris, I went about creating a job to install and patch it up.

To silently install Acrobat 8 Standard, you need to edit the setup.ini from the install directory.

Here is the original setup.ini

[Startup]
RequireOS=Windows XP
RequireMSI=3.0
RequireIE=6.0.2600.0

[Product]
msi=AcroStan.msi
Languages=1033;1031;1036
1033=English (United States)
1031=German (Germany)
1036=French (France)

[Windows XP]
PlatformID=2
MajorVersion=5
MinorVersion=1
ServicePackMajor=2

[MSI Updater]
Path=WindowsInstaller-KB893803-v2-x86.exe

Here is the modified setup.ini to install it silently.

[Startup]
RequireOS=Windows XP
RequireMSI=3.0
RequireIE=6.0.2600.0
CmdLine=/sl"1033" /sall /rs

[Product]
msi=AcroStan.msi
Languages=1033;1031;1036
1033=English (United States)
1031=German (Germany)
1036=French (France)
CmdLine=TRANSFORMS="AcroStan.mst"
PATCH=AcroProStdUpd910_T1T2_incr.msp;AcrobatUpd912_all_incr.msp;AcrobatUpd920_all_incr.msp;AcrobatUpd930_all_incr.msp;AcrobatUpd932_all_incr.msp;AcrobatUpd933_all_incr.msp;AcrobatUpd940_all_incr.msp;AcrobatUpd942_all_incr.msp;AcrobatUpd945_all_incr.msp;AcrobatUpd946_all_incr.msp;AcrobatUpd950_all_incr.msp;AcrobatUpd951_all_incr.msp;AcrobatUpd952_all_incr.msp

[Windows XP]
PlatformID=2
MajorVersion=5
MinorVersion=1
ServicePackMajor=2

[MSI Updater]
Path=WindowsInstaller-KB893803-v2-x86.exe

SCCM Pixologic ZBrush 4R6 FL

Hi all, I will be posting SCCM Application Jobs as often as I can.

This is installed via SCCM 2012 SP1. Created an Application for this under Software Library Application Management.

This is the Programs Tab for this Deployment.

Here is the batch script I created to install Pixologic ZBrush 4R6 FL. This is the floating license version.


echo Installing ZBrush 4R6 FL - Please Wait.
echo Window will close after install is complete

REM Install ZBrush 4R6 FL
"%~dp0ZBrush_4R6_FL_Installer_WIN.exe" --mode unattended

REM Install 32-bit customisations
if exist "%programfiles%\Pixologic\ZBrush 4R6 FL\ZBrush.exe" copy /Y "%~dp0zbrush_license.lic" "%programfiles%\Pixologic\ZBrush 4R6 FL\Licenses\"
if exist "%programfiles%\Pixologic\ZBrush 4R6 FL\ZBrush.exe" copy /Y "%~dp0FloatingLicenseDLL.dll" "%programfiles%\Pixologic\ZBrush 4R6 FL\ZData\ZPlugs\RLM\"

REM Install 64-bit customisations
if exist "%ProgramFiles(x86)%\Pixologic\ZBrush 4R6 FL\ZBrush.exe" copy /Y "%~dp0zbrush_license.lic" "%programfiles(x86)%\Pixologic\ZBrush 4R6 FL\Licenses\"
if exist "%ProgramFiles(x86)%\Pixologic\ZBrush 4R6 FL\ZBrush.exe" copy /Y "%~dp0FloatingLicenseDLL.dll" "%programfiles(x86)%\Pixologic\ZBrush 4R6 FL\ZData\ZPlugs\RLM\"

REM Return exit code to SCCM
exit /B %EXIT_CODE%

This is the Detention Rule Tab For this Deployment.

Altiris Job for Pixologic ZBrush 4 R4

We got a ticket we quite a few requests to install the latest version of ZBrush 4 R4 on several PC’s.

I went ahead and started looking on Pixologic’s site and on the web. I could not locate any info doing a silent install. I tried extracting the .exe with no luck.
You can also run the installer and then check under the AppData\Local\ to see if it extracted an msi or setup files. I didn’t find anything useful.

I tried running the exe with different switches from the command prompt.

ZBrush_4R4_Installer_WIN.exe /s
ZBrush_4R4_Installer_WIN.exe /q
ZBrush_4R4_Installer_WIN.exe /h

None of the above worked.

I got lucky with –help

ZBrush_4R4_Installer_WIN.exe --help

It brought up a pop up with these commands.

ZBrush 4R4 4R4
Usage:

--help Display the list of valid options

--version Display product information

--unattendedmodeui Unattended Mode UI
Default: none
Allowed: none minimal minimalWithDialogs

--optionfile Installation option file
Default:

--debuglevel Debug information level of verbosity
Default: 2
Allowed: 0 1 2 3 4

--mode Installation mode
Default: win32
Allowed: win32 unattended

--debugtrace Debug filename
Default:

--enable-components Comma-separated list of components
Default: application,documentations,plugins,3dpe,BlendShapes,decimationmaster,imageplane,
multimapexporter,paintstop,subtoolmaster,transposemaster,uvmaster,zapplink,adjustdfzsizeplug
Allowed: documentations plugins 3dpe BlendShapes decimationmaster imageplane multimapexporter
paintstop subtoolmaster transposemaster uvmaster zapplink adjustdfzsizeplug

--disable-components Comma-separated list of components
Default:
Allowed: documentations plugins 3dpe BlendShapes decimationmaster imageplane multimapexporter
paintstop subtoolmaster transposemaster uvmaster zapplink adjustdfzsizeplug

--installer-language Language selection
Default: en
Allowed: en ar bg ca da nl et fr fi de el es es_AR he hr hu it ja ko pl pt_BR pt ro ru no sl sk sq sv tr zh_TW zh_CN va cy cs

--prefix Installation Directory
Default: ***unknown variable default_installdir***

So I tried

ZBrush_4R4_Installer_WIN.exe --mode unattended

from a command prompt and I did get one pop up from “Microsoft Visual C++ 2010 x64 Redistributable Setup” when i clicked on Ok the installation finished.

I then went into the Altiris Deployment Console for 6.9 to create the software job.

I called the job Zbrush 4R4 then clicked on Add | Distribute Software then clicked on the folder to browse to the location of ZBrush.
Then under Additional command-line switches section I entered

--mode unattended

then clicked on finish.

I ran the job on a few test PC’s and it installed fine and that Microsoft pop up does not come up.
You still have to manually Activate the software.

Altiris Jobs

Where I work they have Altiris 6.9 and are in the process of getting Altiris 7.1 up and running in parallel.

I thought I would share some of the software jobs I got working. So others don’t have to re-invent the wheel.

I will try and post one a week. If you have any request let me know.

Finding your optimum MTU

Finding your optimum MTU can help get the best Internet speed. MTU stands for Maximum Transmission Unit, which is basically the size of the packet sent from your PC to the Internet.

Default MTU size

Cable = 1500
PPOE = 1492 or lower
VPN = 1300

Most routers allow you change the MTU from their Web GUI. It is usually set to 1500 or you can have it set to Auto. To change it on the PC’s is a little harder.

On Windows 7, open a command prompt

To check what the MTU is on all subinterfaces type

netsh interface ipv4 show subinterfaces

To set it type

netsh interface ipv4 set subinterface "Local Area Connection" mtu=1500 store=persistent

To find out what MTU to set, open a command prompt and type

ping -f -l 1472 www.yahoo.com

Using a -f switch sets it not to fragment the packets.
The -l switch is used to set the packet size.

I used www.yahoo.com as the destination to ping. You can use whichever.

1472 = Ethernet Default MTU
28 = Packet Header

1472 + 28 = 1500

If the packet can’t be sent because it would need to be fragmented you will get something similar to this:

Packet needs to be fragmented but DF set.

So you will need to run the ping command with different packet sizes to determine the optimum packet size. Keep trying lower packet sizes by 10 (i.e. -l 1460, 1450, 1440, etc.) until you get a successful ping request. Raise your packet sizes by one until you get a “Packet needs to be fragmented but DF set.”. The last successful value plus 28 will be your MTU value.
For example a packet size of 1460 succeeds, but 1461 fails, so 1460 + 28 = 1488.

I had the Cisco VPN software installed which changed my MTU to 1300. I uninstalled the software and rebooted, but my MTU still was set to 1300. I ran the netsh command above and it changed it, but after a reboot it reverted back to 1300.

I found the location in the registry where the MTU setting is kept and changed it there.

HKEY_LOCAL_MACHINE\SYSTEM\CurrentControlSet\Services\Tcpip\Parameters\Interfaces

I then went through the different interfaces, until I found the one with my current IP for the Lan Interface. I edited the MTU and set the hexadecimal value of 5dc. Which sets the MTU to 1500. I closed the registry and rebooted. The MTU was now still set to 1500. Success.

DFS disabled on Windows 7

DFS (Distributed File System) not working on Avid Windows 7 PC’s. I had gotten a call from one of our editorial support techs. They were deploying Windows 7 PC’s on the domain with the Avid editing software.  They were not able to connect to DFS shares on the domain. This is the error they would try and connect to a DFS, “An unexpected network error has occurred.”   DFS has been working fine on our PC’s which use the same hardware as they did.  HP Z800’s the only difference is they had a PCI-E Controller for the Avid hardware.

The PC had the Avid Unity MediaNetwork client software installed. After checking online, it turns out the Avid Unity software disables DFS on Windows 7 by default. Here’s the PDF were I found out about this on page 17.

I was able to fix this remotely. I ran computer management from the Administrative Tools in the control panel | services | turned on Remote Registry.

I then ran regedit from Start | Run | regedit | File |  Connect Network Registry

I then just browsed to

HKEY_LOCAL_MACHINE\SYSTEM\CurrentControlSet\Services\Mup

and right click on DisableDfs entry and select modify.

Type 0 in the Value data text box to enable DFS or Type 1 to disable it.

Fixing Profile Issues in Windows 7

A lot of Windows 7 issues can be resolved simply by creating a new Windows 7 profile.  Here’s a common error you get, “You have been logged in with a temporary profile.”  If your users log on to the domain and do not have local admin rights then any virus they get will get contained only to their profile.  So by moving the profile a side and creating them a new profile, this will completely remove the virus.

For example, companies that have domain users like in our company, have roaming profiles turned on. So if a user is having issues on multiple computers, but everyone else works fine on the same PC’s. Then the simplest solution is to log the user out and rename their local profile and their network profile to profilename_backup. Then just reboot the PC and have the user log back in, so a new profile gets created. Then you can copy all their files back from the local profile that was renamed. I would just copy over their Desktop files, favorites, and specific files.

In Windows XP, user profiles are located here

c:\Document and Settings

In Windows 7, user profiles are located here

c:\Users

The path to the network profile is set by your Domain Admin, look in Active Directory Users & Computers for the user account under the Profile tab.

This is all you had to do on Windows XP, but now in Windows 7 there is another extra step. You need to go into the registry and delete the reference to the old profile.

Go to Start | Run | regedit.exe

Then browse to

HKEY_LOCAL_MACHINE\SOFTWARE\Microsoft\Windows NT\CurrentVersion\ProfileList

Then browse through the sub folders until you locate the one for your user name.  Each sub folder will have a record called ProfileImagePath which has the path to your profile. Then just delete the whole sub folder in the registry which contains your user name.

Now reboot the PC and log back in and copy their files back from the local backed up profile and log out and back in, so the profile gets copied to the network.